No products
BLOG NEWS
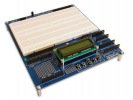
 USING A 16x2 LCD DISPLAY WITH THE IoT PROTO SHIELD PLUS
  What does Paolo Aliverti say about the IoT Proto Shield Plus?
  USING AN SSD1306 128x32 OLED DISPLAY (I2C type) WITH THE IoT PROTO SHIELD PLUS
  USING AN SSD1306 128x64 OLED DISPLAY (I2C type) WITH THE IoT PROTO SHIELD PLUS
  I2C Bus on the IoT Proto Shield Plus
 Search on blog
Follow us on facebook
Top sellers
-

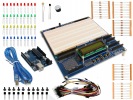
Proto Shield Plus STARTER KIT
This kit is the ideal solution for those who want to start to prototype...
69,90 € -

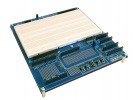
Proto Shield Plus LCD KIT
Prototype with ARDUINO / GENUINO boards without having a lot of wires...
56,00 € -

SMD to breadboard adapter (10 pcs pack)
Easily adapt SMD devices to 2.54mm prototyping breadboards.
3,90 € -

Proto Shield Plus BASE KIT
Prototype with ARDUINO / GENUINO boards without having a lot of wires...
52,00 €
VISUAL MICRO for ATMEL STUDIO FEATURES
Published : 09/18/2018 15:28:30
Categories : Proto Shield Plus

VISUAL MICRO for ATMEL STUDIO FEATURES
This is not intended to be an exhaustive tutorial covering all the features of Visual Micro for Atmel Studio, it is just a sneak peek to the features that intrigued me to evaluate this IDE.
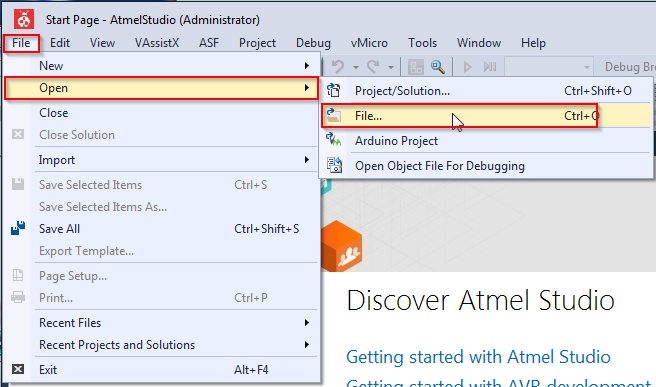
First of all let’s open an Arduino sketch file
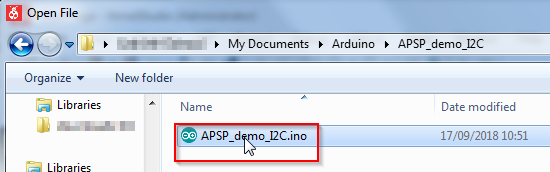
Let’s start opening an existing .ino file.
i.e. Let’s open the APSP_demo_I2C.ino available from the Proto Shield Plus sample sketches (https://www.gtronicsshop.com/en/index.php?controller=attachment&id_attachment=2).
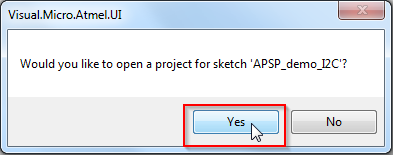
Once opened, your code will be shown in the code window.
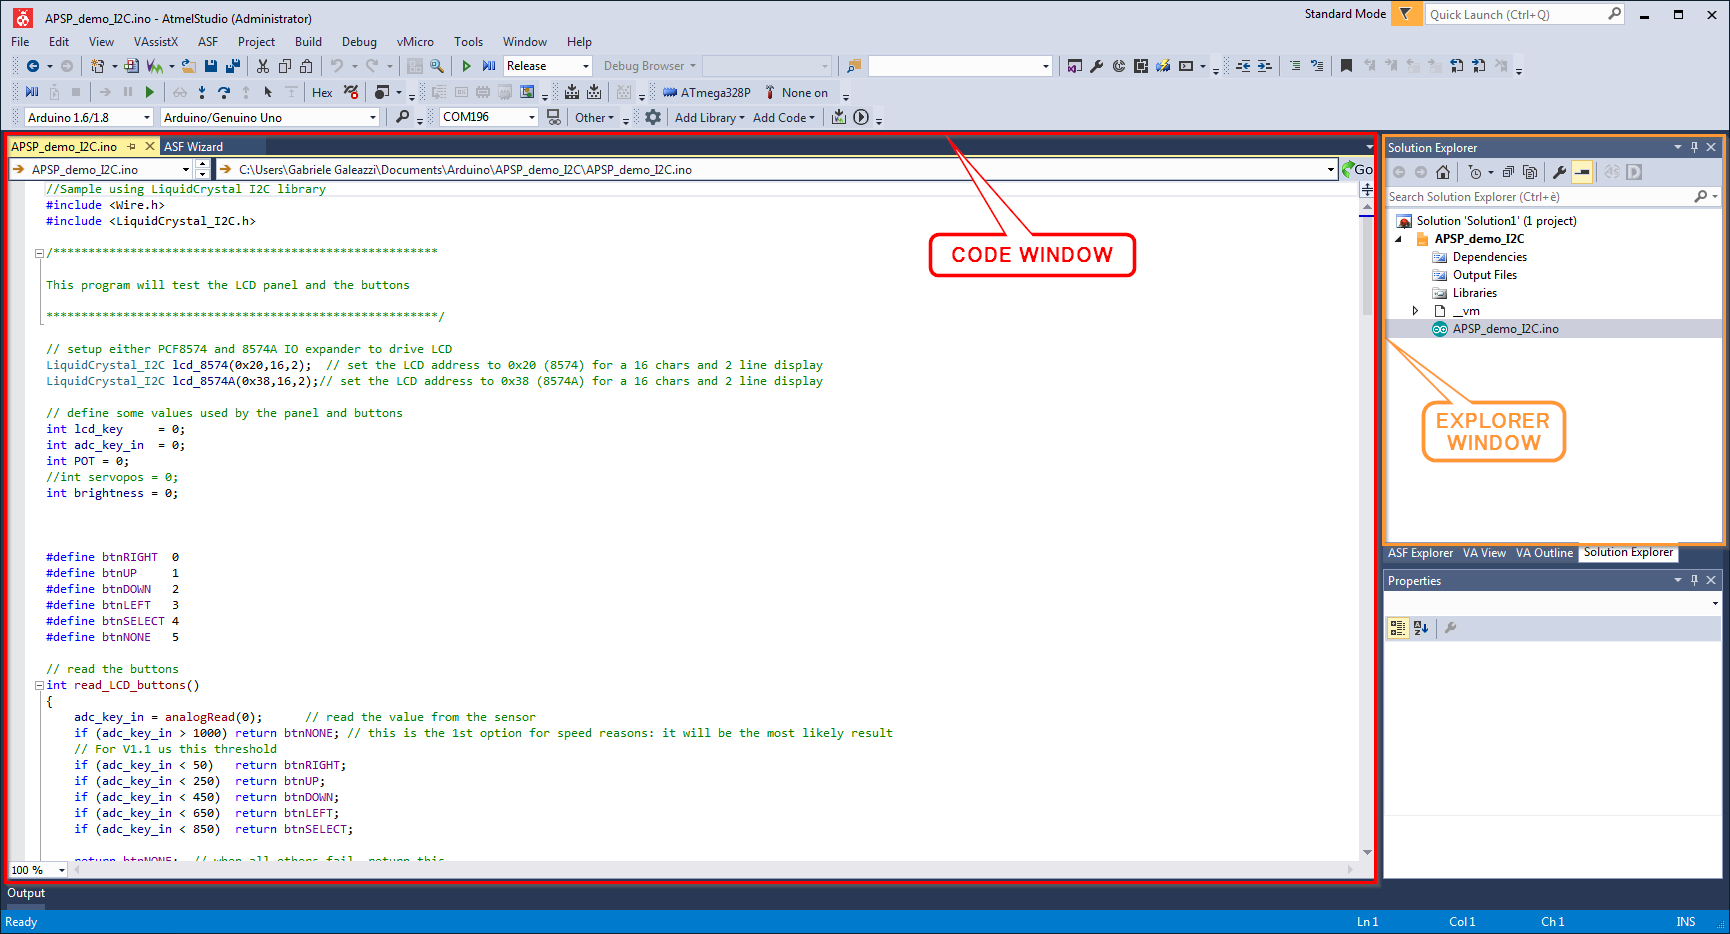
We’re now ready to start discovering some nice and useful Visual Micro IDE features.
Expand / contract code sections
For each “section” (code function or comment block) you can contract the section for a more readable code.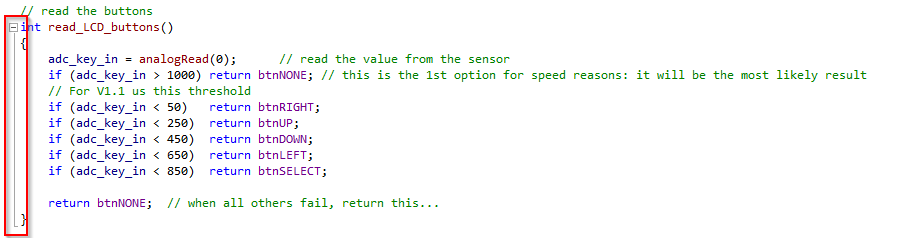
By clicking on the “-“ symbol the section will contract.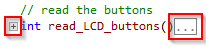
By clicking on the “+“ symbol (or double clicking on the “…” symbol) the section will expand.
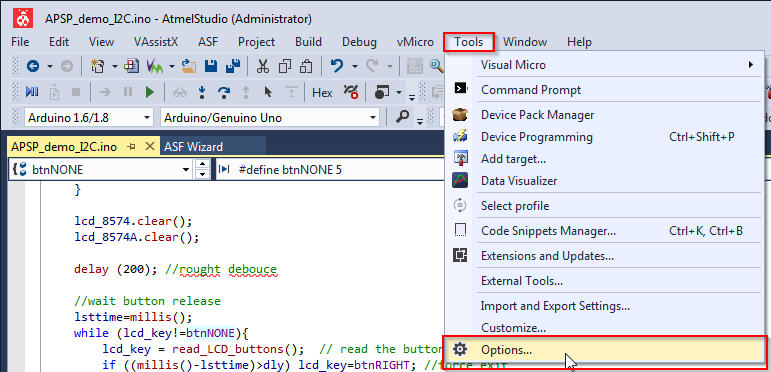
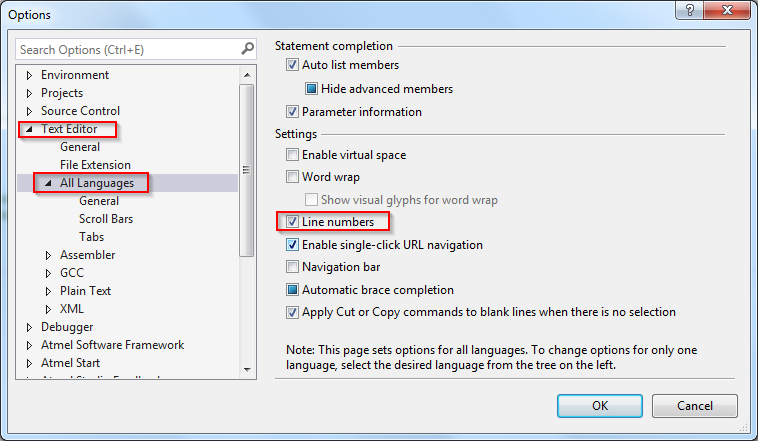
Show line numbers
OK! This is not a key feature since it is present even in the “standard” Arduino IDE, but it could be handy in this document and it has to enabled in Visual Micro for Atmel Studio.
Tools->Options->Text Editor->All Languages->Line numbers
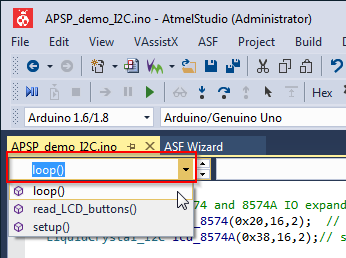
Direct jump to the desired function
On the top left of the code window you will find a drop down menu, it shows all the functions (methods) in your sketch.
Just click on the desired function and you will directly jump to its code implementation.
Bookmarks (and Text Editor toolbar)
Another way to jump up and down in the code is using bookmarks.
Select a line and then click on the Toggle a bookmark on the current line button ![]() to set a bookmark on the current line.
to set a bookmark on the current line.
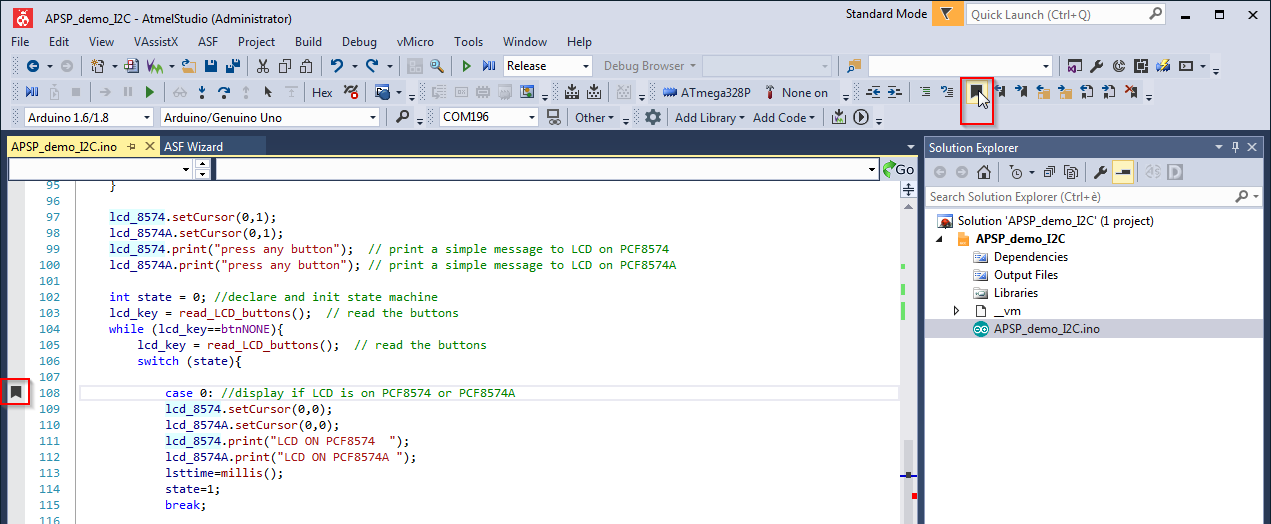
Use the other buttons to navigate through the bookmarks and to manage them
![]()
In the Text Editor bar you will also find the buttons to increase or decrease indent
![]()
and the buttons to Comment or Uncomment selected lines
![]()
These two function are present in the standard Arduino IDE too, but it worth mentioning them since they are very used.
Direct view or jump to constant or variable definition
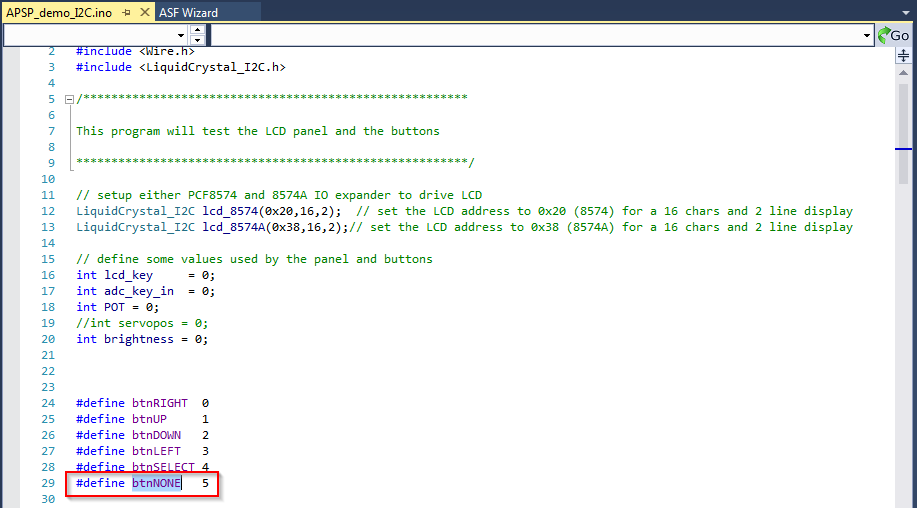
Let’s assume you would like to jump to the definition btnNONE (see line 103 of the APSP_demo_I2C sketch), just click on btnNONE, it will be highlighted in light blue, the same highlight will be applied to all the other btnNONE in the code (notice that even btnNONE on lines 91 and 79 are highlighted in light blue).
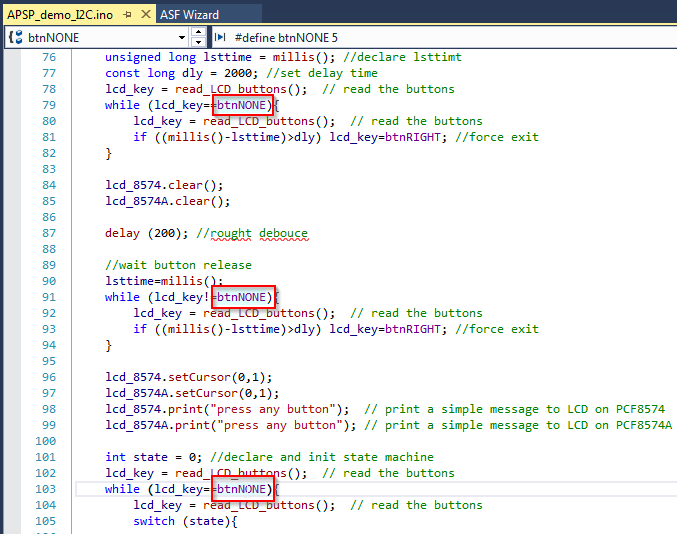
You will also notice that the Context Bar shows your current selection and the Definition bar shows the definition of btnNONE.
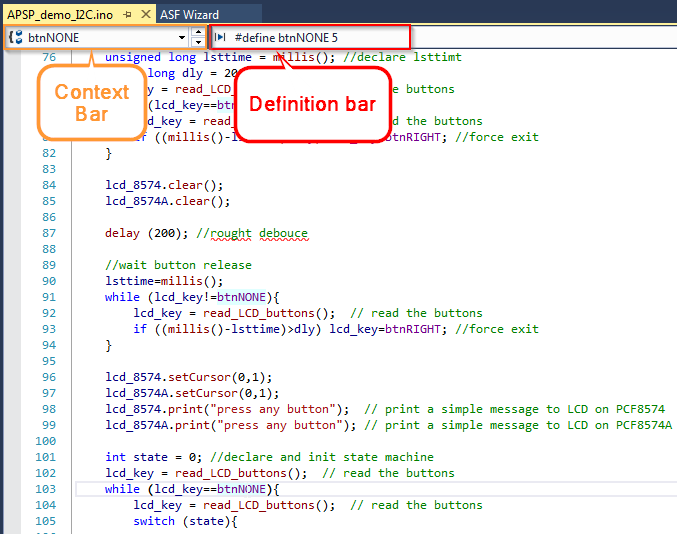
By clicking on the “GO” button on the right of the Definition bar, you will jump to the btnNONE constant implementation.
![]()
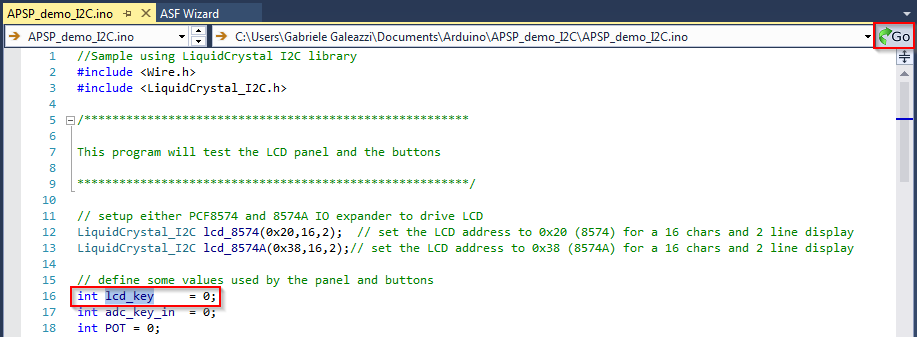
The same applies to variable definitions: select lcd_key on line 91, all the lcd_key will be highlighted and the Definition bar shows the definition of lcd_key variable.

Of course, by clicking on the “GO” button, you will directly jump to the implementation of lcd_key.
Now experiment by yourself with the Definition bar and discover all its power, for example you can directly dig into libraries (.h and .cpp files) to discover how they are implemented….
Try to select setBacklight on line 63 and then click the “GO” button, you will notice that you can open and navigate in the .h or the .cpp implementation in the LiquidCrystal_I2C class.
Now try to select
Easy access to find and rename
By selecting any word (variable, constant, command, etc.) and leaving the cursor over the selected word, a little icon appears next to it ![]()
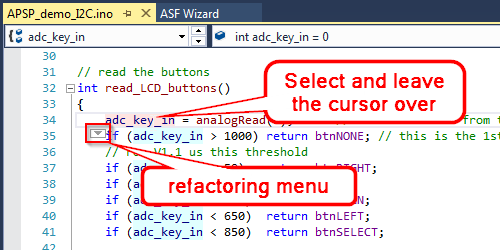
Click on the icon to open the refactoring menu.
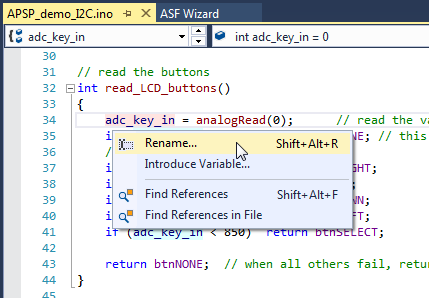
This menu lets you quickly access the Find and Rename (Replace) features.
Find
By clicking on Find References the VA Find References Results window will open.

Double clicking on each row will lead you to the selected row in the code window.
Rename (Replace)
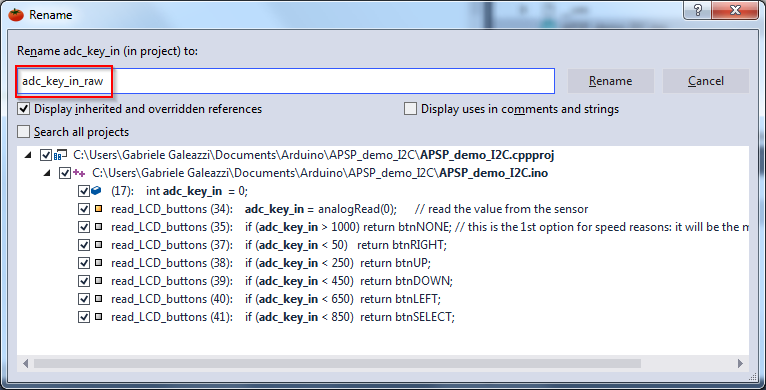
By clicking on Rename (better known as “Replace” in most of the other software) the Rename window will open.
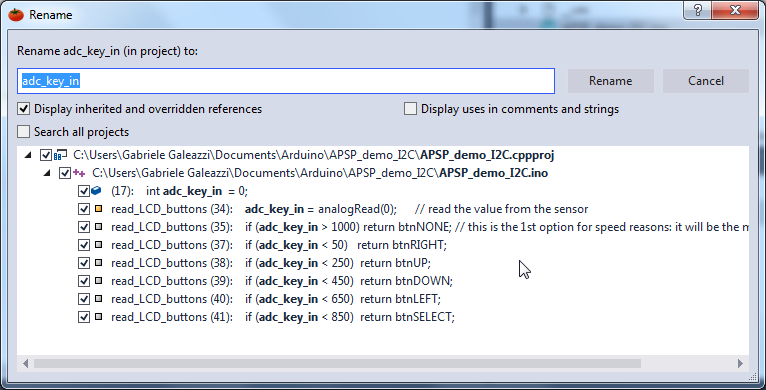
The Rename window lets you choose the new name (i.e. adc_key_in will be renamed to adc_key_in_raw).
The windows shows the opened projects and files and all the occurrences of the selected word.
You can select or deselect the single projects, files or occurrences.
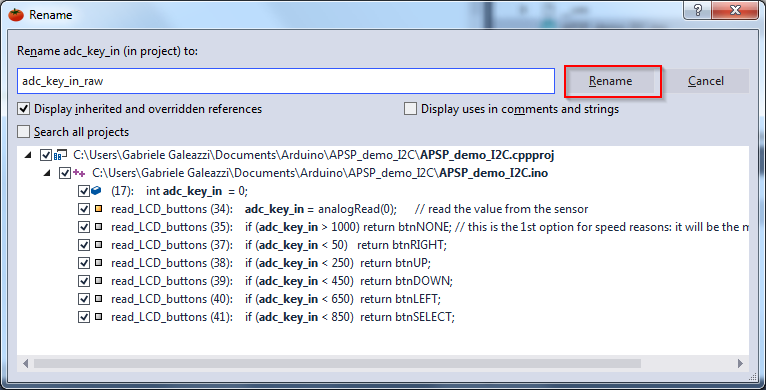
By clicking on Rename button all the matched words in the selected projects, files and occurrences will be renamed (replaced) with the new name.
Track Changes
Following the example shown in the previous chapter, you will notice that as soon as you click on the Rename button all the adc_key_in became adc_key_in_raw.
In addition, a yellow bar on the left of the code shows that those lines have been modified since the last file opening
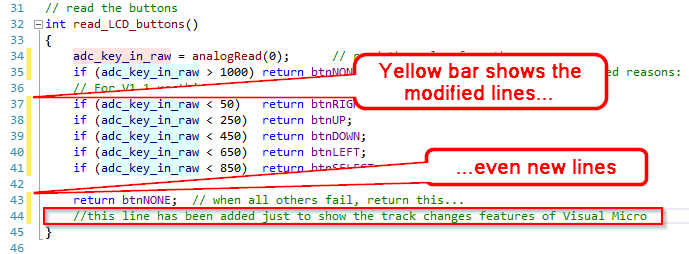
Once the file has been saved, all the yellow bars became green showing you that the file has been modified and the changes are saved.
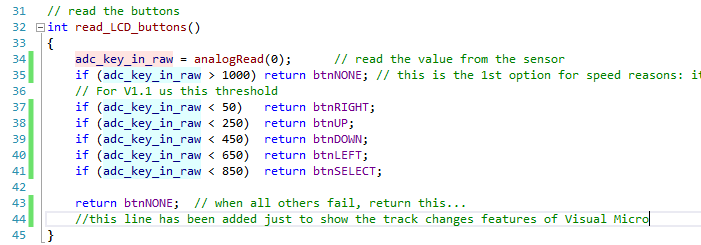
It helps you to keep track of all changes while writing code.
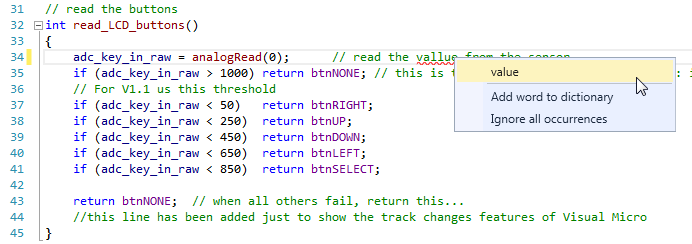
Spell check
It is not so bad to have a spell check in the editor too...
Word wrap
Tools->Options->Text Editor->All Languages->Word wrap
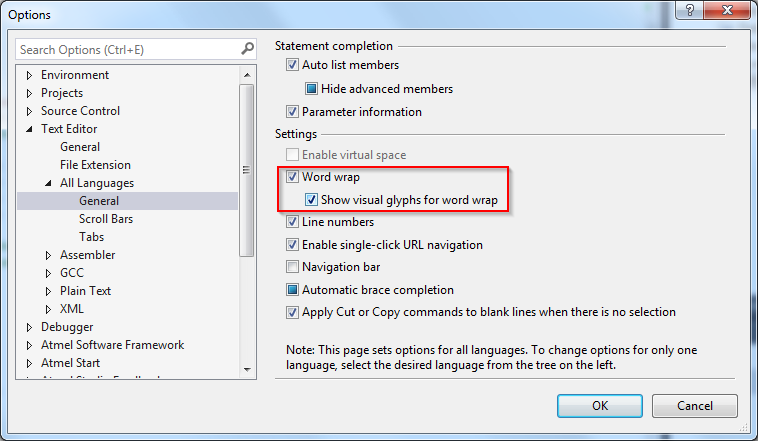
I suggest you to check even Show visual glyphs for word wrap

In addition, with line numbering enabled, it is quite easy to see when the line is “wrapping”.
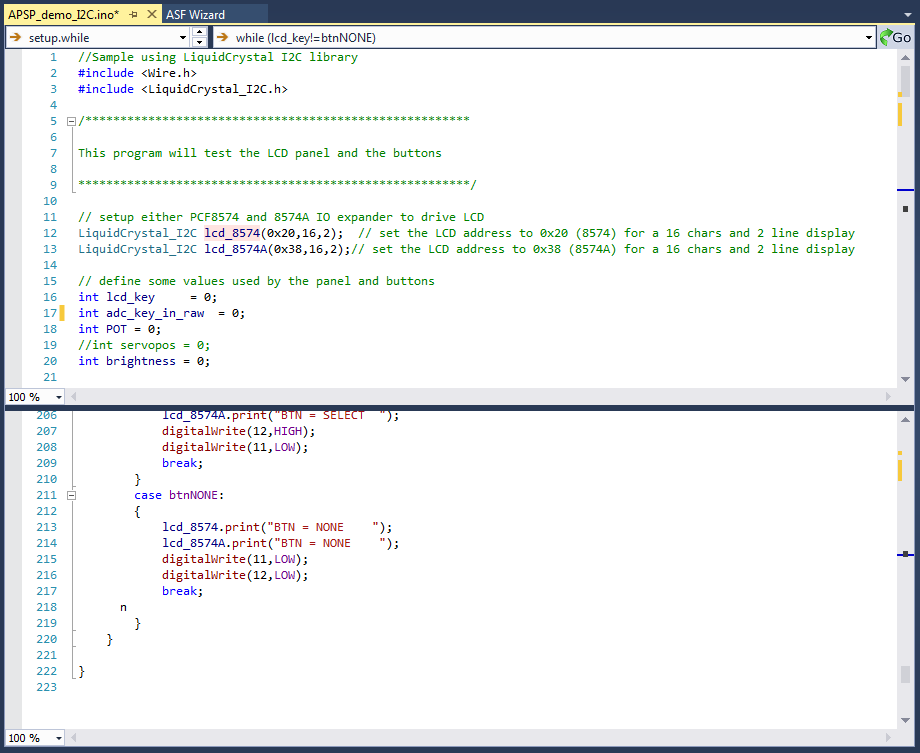
Splitting the Code Window
By clicking on the Split window handle, you can drag it and split the code window in two section.
It is quite useful when you have to work on different part of code at the same time.

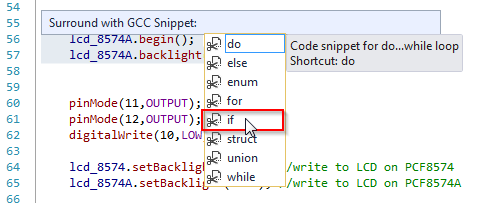
Surround code with (code snippets)
If you want to easily surround a code section into an "if" statement (i.e.), just select the desired lines of code and then right click on the selection: a pop-up menu appears.
Use Surround with (VA), Insert Snippet or Surround with (they are all quite the same) to surround your selection with the desired snippet (do, if, while, etc.).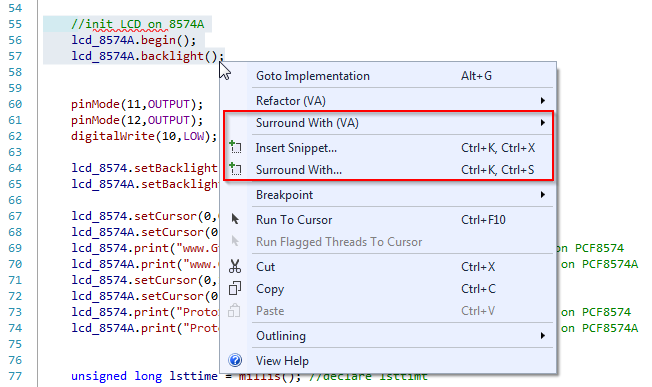
Of course, you have to replace "expression1" with your desired expression.
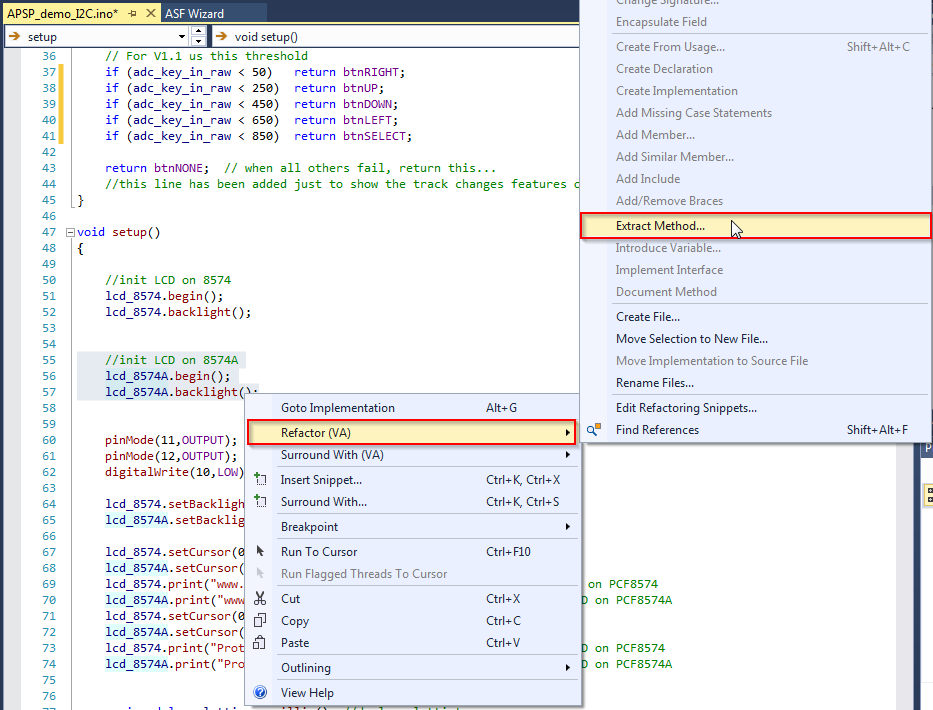
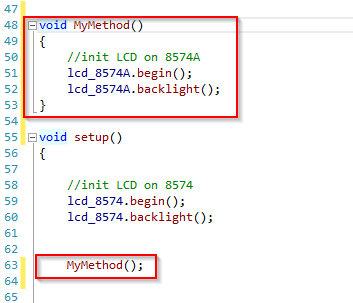
Extract Method
If you want create a method (or function, call it whatever you like it…) starting from a part of your code, just select the part of your code and then right click on the selection.
Click on Refactor (VA)->Extract Method
Insert the name of your new method and then click OK
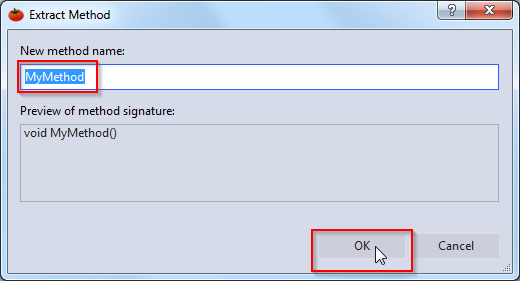
The selected code will be moved to a new method and your selection will be replaced with the call at the new method.
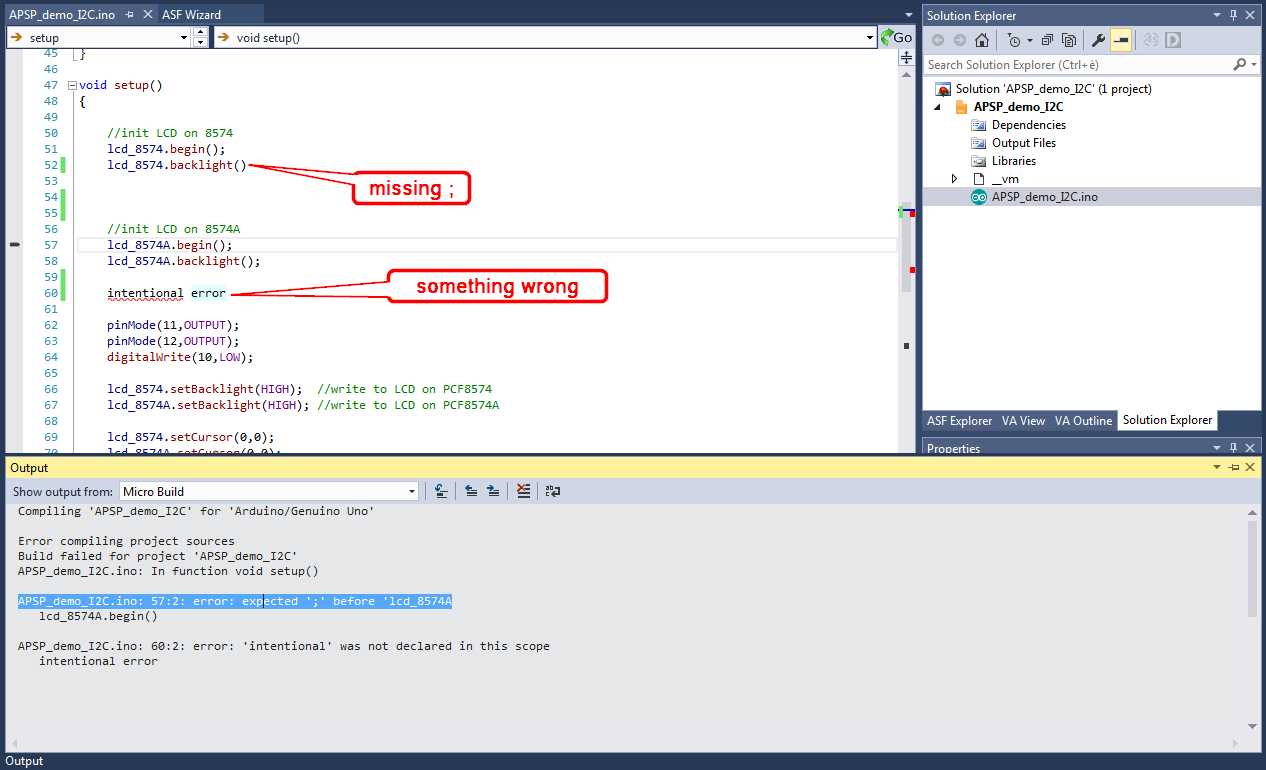
Direct jump to compiler errors
This function was not present in the old Arduino IDE, now it is present in it too, anyway it worth mentioning this feature since it is very useful.
The compiler will report all the errors in the Output window, double click on the error (if errors are present, of course!) and the code window will directly jump to the error in your code.
Compile and upload speed
You will probably notice that compiling and uploading the sketch to the Arduino board are quite faster than with the standard Arduino IDE.
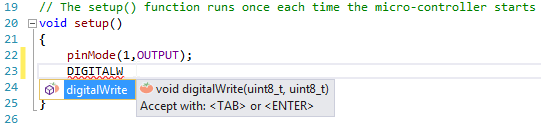
Auto Completion
You will also benefit of the auto completion which helps a lot while writing code…
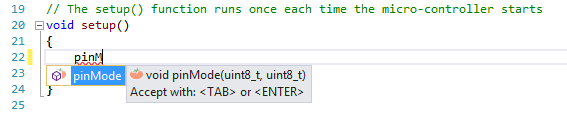
It is case “insensitive” too and it is very very useful…..
Conclusion
As mentioned at the beginning of this article, this is not intended to be an exhaustive tutorial covering all the features of Visual Micro for Atmel Studio, it is just a sneak peek to the features that intrigued me to evaluate this IDE.
If these features are intriguing you as well, just give Visual Micro a try and discover other features that fit your needs, expectations and skills.
In the next article we will finally look at the debug features of Visual Micro IDE…

INSTALLING VISUAL MICRO for ATMEL STUDIO
Read more
Published : 09/10/2018 16:18:11
VISUAL MICRO for ATMEL STUDIO - DEBUGGING YOUR ARDUINO CODE
Read more
Published : 10/16/2018 21:33:19