No products
BLOG NEWS
 USING A 16x2 LCD DISPLAY WITH THE IoT PROTO SHIELD PLUS
  What does Paolo Aliverti say about the IoT Proto Shield Plus?
  USING AN SSD1306 128x32 OLED DISPLAY (I2C type) WITH THE IoT PROTO SHIELD PLUS
  USING AN SSD1306 128x64 OLED DISPLAY (I2C type) WITH THE IoT PROTO SHIELD PLUS
  I2C Bus on the IoT Proto Shield Plus
 Search on blog
Follow us on facebook
Top sellers
-

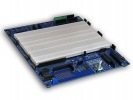
Proto Shield Plus STARTER KIT
This kit is the ideal solution for those who want to start to prototype...
69,90 € -

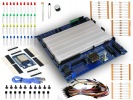
Proto Shield Plus LCD KIT
Prototype with ARDUINO / GENUINO boards without having a lot of wires...
56,00 € -

SMD to breadboard adapter (10 pcs pack)
Easily adapt SMD devices to 2.54mm prototyping breadboards.
3,90 € -

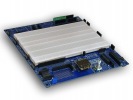
Proto Shield Plus BASE KIT
Prototype with ARDUINO / GENUINO boards without having a lot of wires...
52,00 €
USING A 16x2 LCD DISPLAY WITH THE IoT PROTO SHIELD PLUS
Published : 06/08/2022 09:20:57
Categories : IoT Proto Shield Plus , Proto Shield Plus
USING A 16x2 LCD DISPLAY WITH THE IoT PROTO SHIELD PLUS
The IoT Proto Shield Plus is ready to work with 16 pins LCD 1602 displays of widespread use.
To work with an LCD 1602 display, just plug the module into the LCD16x2 header according to Figure below.
Use RV1 to adjust the LCD contrast.
The LCD 1602 is driven by I2C by means of the onboard PCF8574 (I2C I/O expander) and it does not require any additional wiring.
Signal connections are the same used in the LCD I2C adapter of widespread use.
Since ESP32, ESP8266 and NANO33 boards works at 3.3V, to have a sufficient contrast on the display, ICL7660 is used to ensure a sufficient voltage to the V0 pin of the LCD 1602 module.
Depending on component availability, the I/O expander 8574 could be the PCF8574 or the PCF8574A.
Both versions perform the same, the only difference is the base address of the I2C communication.
Since A0, A1 and A2 of the PCF8574 connect to ground by default (by means of JP17, JP16 and JP15), the default address is set to 0x20 (PCF8574) or 0x38 (PCF8574A).
Use the sample sketches described below to find out which version is your one.
LCD 16x2 header of the IoT Proto Shield Plus 
Schematic of the IoT Proto Shield Plus LCD 16x2 section 
An LCD 1602 display module plugged into the 16 pins header of the IoT Proto Shield Plus
DEFAULT CONNECTIONS
Refer to the blog article "I2C Bus on the IoT Proto Shield Plus" to see default routing of I2C signals on the IoT Proto Shield Plus.
SAMPLE SKETCHES
Download the sample sketches by clicking here.
Location: IoTPSP_Sample_Sketches/IoTPSP_LCD16x2
These sketches make use of the LiquidCrystal_I2C library, you will find the library in the IoTPSP_Sample_Sketches/IoTPSP_LCD16x2 path.
Use the IoTPSP_LCD16x2_NANO sketch to test the LCD1602 with ARDUINO NANO boards.
Use the IoTPSP_LCD16x2_ESP32 sketch to test the LCD1602 with ESP32 boards.
Use the IoTPSP_LCD16x2_ESP8266 sketch to test the LCD1602 with ESP8266 boards.
Changing the I2C address of the PCF8574
It is not very usual, but in case that you want or need to change the address of the 8574 chip, you have to OPEN or CLOSE JP17, JP16 and JP15 according to your needs and the PCF8574 datasheet.
To OPEN JP17, JP16 or JP15 cut them in the middle.
To CLOSE them solder a little drop of tin.
Using the PCF8574 with different I2C GPIO pins
Refer to the blog article "I2C Bus on the IoT Proto Shield Plus" to see how to use I2C with different GPIO pins on the IoT Proto Shield Plus.
Related products

5V and 3V3 on the IoT Proto Shield Plus board
Read more
Published : 02/04/2022 08:40:16
I2C Bus on the IoT Proto Shield Plus
Read more
Published : 04/22/2022 09:41:11
Introducing the new IoT Proto Shield Plus
Read more
Published : 11/11/2021 08:34:28
Plug & Play modules on the IoT Proto Shield Plus
Read more
Published : 01/13/2022 15:43:02
The IoT Proto Shield Plus Layout
Read more
Published : 12/17/2021 09:12:04
Using the IoT Proto Shield Plus with Arduino and ESP boards
Read more
Published : 02/11/2022 08:36:34 WITH THE IoT PROTO SHIELD PLUS")
USING AN SSD1306 128x64 OLED DISPLAY (I2C type) WITH THE IoT PROTO SHIELD PLUS
Read more
Published : 05/06/2022 08:11:49 WITH THE IoT PROTO SHIELD PLUS")
USING AN SSD1306 128x32 OLED DISPLAY (I2C type) WITH THE IoT PROTO SHIELD PLUS
Read more
Published : 05/20/2022 08:20:56