No products
BLOG NEWS
 USING A 16x2 LCD DISPLAY WITH THE IoT PROTO SHIELD PLUS
  What does Paolo Aliverti say about the IoT Proto Shield Plus?
  USING AN SSD1306 128x32 OLED DISPLAY (I2C type) WITH THE IoT PROTO SHIELD PLUS
  USING AN SSD1306 128x64 OLED DISPLAY (I2C type) WITH THE IoT PROTO SHIELD PLUS
  I2C Bus on the IoT Proto Shield Plus
 Search on blog
Follow us on facebook
Top sellers
-

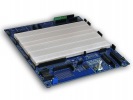
Proto Shield Plus STARTER KIT
This kit is the ideal solution for those who want to start to prototype...
69,90 € -

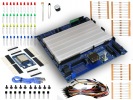
Proto Shield Plus LCD KIT
Prototype with ARDUINO / GENUINO boards without having a lot of wires...
56,00 € -

SMD to breadboard adapter (10 pcs pack)
Easily adapt SMD devices to 2.54mm prototyping breadboards.
3,90 € -

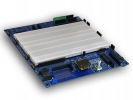
Proto Shield Plus BASE KIT
Prototype with ARDUINO / GENUINO boards without having a lot of wires...
52,00 €
Plug & Play modules on the IoT Proto Shield Plus
Published : 01/13/2022 15:43:02
Categories : IoT Proto Shield Plus , Proto Shield Plus
Plug & Play modules on the IoT Proto Shield Plus
If you search on internet the definition for "Plug and Play", you may find something like:
" Plug and Play, sometimes, abbreviated PnP, is a catchy phrase used to describe devices that work with a computer system as soon as they are connected.
The user does not have to manually install drivers for the device or even tell the computer that a new device has been added.
Instead the computer automatically recognizes the device, loads new drivers for the hardware if needed, and begins to work with the newly connected device. "
[source: https://techterms.com/definition/plugandplay]
Speaking in terms of the IoT Proto Shield Plus, we can modify the above sentence to:
" Plug and Play is used to describe hardware modules that work as soon as they are connected to the IoT Proto Shield Plus.
The user does not have to manually connect the hardware module pin by pin with juper cables to the Arduino Nano or ESP controller board.
Instead, all the needed connections between the hardware module and the controller board are routed on the IoT Proto Shield Plus. "
Of course there are different types of the same module on the market, the IoT Proto Shield Plus is designed to be Plug and Play with the most common modules of widespread use (more details on the user manual).
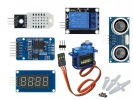
So, let's suppose you want to use a DHT module (humidity sensor module)

all you have to do is just to plug the DHT module of widespread use into its designated header.
Check the default pinout assignment of the IoT Proto Shield Plus, and that's it.


Now let's suppose that you want to use the HC-SR04 ultrasonic distance sensor module.

The power supply of the HC-SR04 must be 5V. Its TRIGGER signal should be either 5V or 3V3, but its ECHO signal will be a 5V signal.
ESP32 and NANO33 boards do not tolerate 5V signals inputting on their pins (otherwise the board could be damaged), so a voltage conditioning is needed.
In this case the IoT Proto Shield Plus, in addition to the signal routing, provides a clipping circuit on the ECHO signal in order to let the HC-SR04 works properly with 3V3 tolerant pins.
So, again, to work with a HC-SR04 module, all you have to do is just plug the module into its dedicated header.


The Plug and Play predisposition of the IoT Proto Shield Plus is designed to work with the following modules, sensors and actuators:
LCD 16x2 display module
OLED SSD1306 128x64 display module
OLED SSD1306 128x32 display module
TM1637 seven-segment display module
RTC (Real Time Clock) module
HC-SR04 (ultrasonic distance sensor) module
RELAY module
DTH11 / DHT22 module or DHT11 / DHT22 bare sensor (humidity sensor)
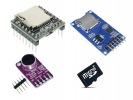
SD Card module
MAX9814 or MAX4466 (microphone) module
DFR0299 MP3 Mini Player (MP3 file music player)
LDR (Light Dependant Resistor)
PTC or NTC (Positive or Negative Temperature Coefficient thermistor)
Servo
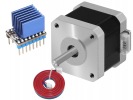
Stepper motor driver (TMC2xxx, DRV8825, DRV8834, A4988) module
The following image shows the layout of the IoT Proto Shield Plus, gray boxes show the Plug and Play headers and sockets.


Downloading the IoT Proto Shield Plus sample sketches you will find some basic examples to work with all the Plug and Play modules compatible with the IoT Proto Shield Plus.
Of course, you can decide to use the GPIO pin dedicated by default to a Plug and Play module to other functions, or ,you can decide to use other GPIO pins to work with a specific module, check out the User Manual to find out all the detailed descriptions for each Plug and Module and GPIO pins.
Many of the above mentioned modules are available in the INVENTOR'S KIT, MOTOR KIT and SD CARD AND AUDIO KIT.
Related products

Introducing the new IoT Proto Shield Plus
Read more
Published : 11/11/2021 08:34:28
The IoT Proto Shield Plus Layout
Read more
Published : 12/17/2021 09:12:04